The Xyron Design Team has been busy creating Wedding and Graduation/ School sets over the past two weeks. You can all the sets on the Xyron Facebook page. I am sharing my Wedding and Graduation sets today as well as a requested tutorial for the pieces in my Graduation set. This will be a long post so you might want to grab a drink and get comfy!
The Wedding set I put together includes wedding cake gift boxes, wedding bells card, wedding dress favor box, and a save the date magnet.

I took the wedding bells studio file and welded the shapes together to create a card.

The wedding dress favor box is another Silhouette Studio file. I added the second layer with DIY Foam Adhesive made with the Xyron 5" Creative Station.

A Save the Date magnet created using the Xyron 5" Creative Station and magnet cartridge.

The Wedding Cake Gift Boxes were made using 3D round box studio files. I added the wedding couple lantern on top and kept the embellishments simple.


Wedding Set Supplies:
Xyron Mega Runner
Xyron 1.5" Sticker Maker
Xyron 5" Creative Station
Xyron 9" Creative Station
DIY Foam Adhesive
Recollections White/ Black Cardstock
Bazzill Cardstock (Green)
Ribbon FX White Ribbon
Doodlebug Design Mini Pearls
Martha Stewart Edge Punch
Silhouette Cameo
Silhouette Studio Files- Round Box, Wedding Couple Lantern, 3D Dress Box, and Wedding Bells
The Graduation set I put together includes a gift card holder, cupcake pillars, and a card.

Let's start by putting together the graduation hat gift card box.


To make the graduation cap gift card box, start by cutting two squares of cardstock- one at 6x6 and the other at 5 7/8 x 5 7/8.

Score at one inch around all four edges of each cardstock square.

Cut tabs from each corner. I like to taper mine a bit to help everything fit together better.

Fold along the score lines and add adhesive to the four tabs using the Xyron Mega Runner.

Adhere together to form the lid and bottom of the box.

To make the insert to hold the gift card you can follow the same basic steps as above. The cardstock square should be cut at 5 3/4 x 5 3/4 inches. To make the slits to hold the gift card I used the Basic Grey Notch Tool. You could also use a craft knife to cut two slits to hold the gift card.


Run one of the 5x5 inch squares and one if the 4x4 inch squares through the Xyron 5" Creative Station. Adhere both the 4x4 inch squares to each other then the two 5x5 inch squares.


Run each of the circles through the Xyron 1.5" Sticker Maker and stack together.

Now that our pieces are ready let's adhere everything to the lid of our box. Adhere the 5x5 inch stacked squares to the lid with the Xyron Mega Runner.


Next we will put together the cupcake pillars. I used white cardstock for the set, but for this tutorial I used black cardstock to make it easier to see each step.

I cut three pillars for my set that measure 3, 4, and 5 inches tall. For this tutorial I am going to show you'd how to make the 5 inch tall pillar. To make the pillar start by cutting a 5x8 1/2 inch piece of cardstock. If you would like to make the other pillars cut your cardstock at 4x8 1/2 and 3x8 1/2 inches and continue with the following steps.

Score the cardstock along the 8.5 inch side at .5 inch, 2.5 inches, 4.5 inches, and 6.5 inches.


Flip the paper over. Starting at the 1/2 inch mark make five score lines every 1/4 inch within each of the two inch rectangles.


Flip the paper back over, fold along the score lines, and add adhesive to the tab using the Xyron Mega Runner.

Adhere the tab in place to form the main part of the pillar.

Next cut four 3x3 inch pieces of cardstock per pillar and one 2x2 inch piece of cardstock.

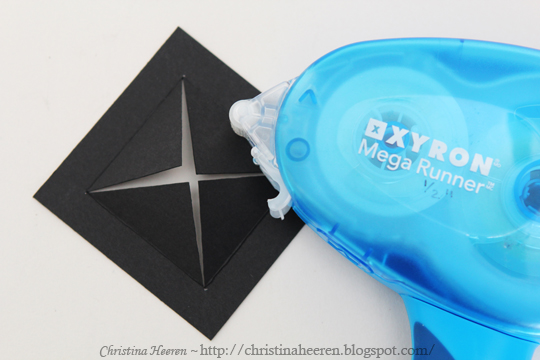
Center the 2 inch piece of cardstock over the 3 inch piece and use a pencil to make a mark at each of the four corners.

Use a craft knife to cut from corner to corner and form an X.

Fold each tab and apply adhesive using the Xyron Mega Runner.

Place the pillar over the base and align with the tabs.

Turn the pillar over and secure the tabs in place.

Apply adhesive using the Xyron Mega Runner along each edge of another 3 inch square and adhere to the base of the pillar.


Do the same for the top and the pillar is complete. I cut 2-3 vines per pillar with my Silhouette Cameo, wrapped them around each pillar, and secured them in place with the Xyron Mega Runner. I also add some Jolees stickers to finish off each of the pillars.

The base of the card was cut with the Silhouette Cameo from Snapdragon Snippet's Graduation Card file. I cut a couple of extra layers for a bit more dimension and adhered them together with the Xyron 5" Creative Station. I also used a 1/2 inch circle punch to punch 6 circles. I applied adhesive to the circles with the Xyron 1.5" Sticker Maker and stacked them together. I secured the tassel between the stacked circles and card.

I used a Hero Arts stamps, Versamark Ink, and American Crafts Embossing Powder to add a sentiment to the inside of the card.

Graduation Set Supplies:
Xyron 5" Creative Station
Xyron 1.5" Sticker Maker
Xyron Mega Runner
Recollections Black and White Cardstock
The Paper Company Cardstock (Green)
Silhouette Cameo
Samantha Walker Leaf/ Vine Border Studio File
Snapdragon Snippet's Graduation Card File
Hero Arts Everyday Sayings Stamp Set
American Crafts White Embossing Powder
Versamark Ink
Jolee's Boutique Cap and Gown Sticker Set
DMC Floss
I hope you enjoyed my projects. We will have lots of great projects to share with you this month so be sure to stop by the Xyron Facebook page to see what's new.
1 comments:
This box is so perfect and creative. Just found your site. Thank You
Post a Comment